OpenClaw 快速部署指南
适用版本: v2026.2.3+ 来源: 官方文档 | GitHub 验证状态: Verified 最后更新: 2026-02-25
概述
OpenClaw 是一个自托管的 AI 网关,连接多个即时通讯应用(WhatsApp、Telegram、Discord、iMessage 等)与 AI 编码代理。本文档提供快速部署指南,帮助你在 15 分钟内完成基础部署并运行你的第一个 AI agent。
核心特点:
- 🔒 本地优先 - 你的数据存储在自己的设备上
- 🌐 多渠道支持 - 一个网关连接所有聊天应用
- 🤖 Multi-Agent 路由 - 支持多个独立 AI agent
- 🎨 可扩展 - 支持 Canvas、Browser Automation、Cron 等功能
整体架构
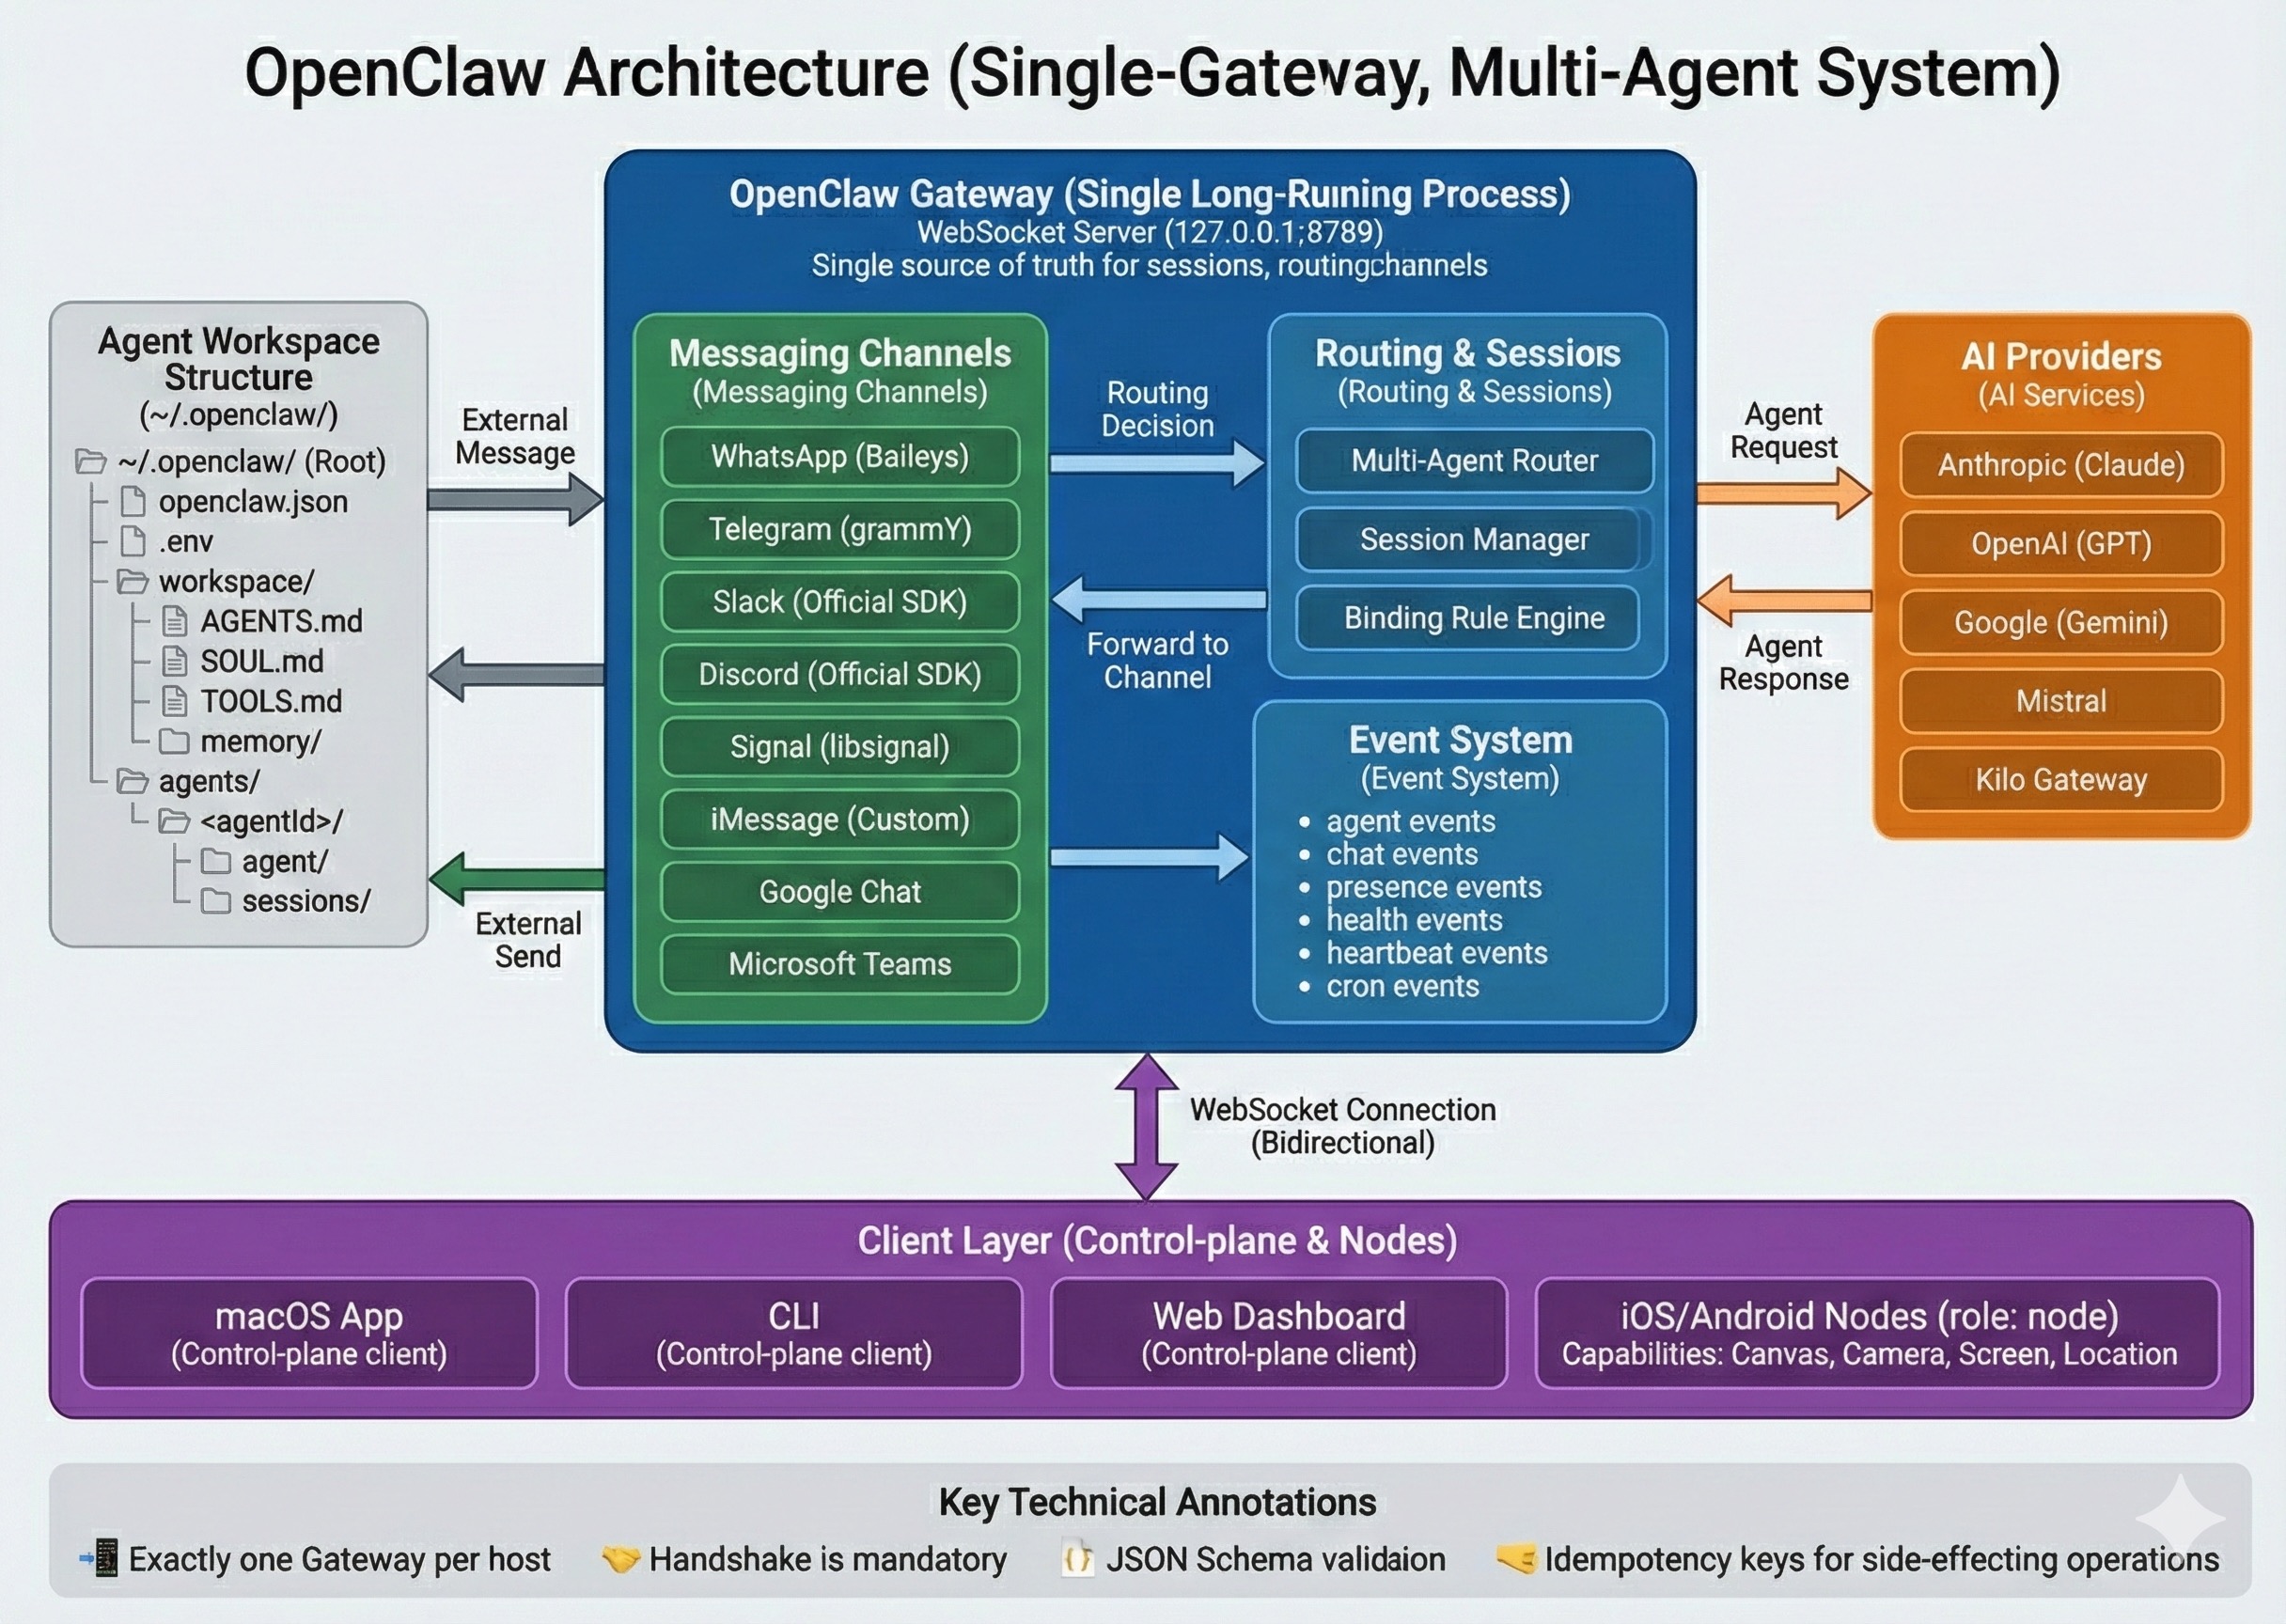 图:OpenClaw 采用单一 Gateway 守护进程模型,集中管理所有消息通道
核心组件
Gateway(网关):
- 单一长期运行的守护进程
- WebSocket Server (
127.0.0.1:18789) - 所有会话、路由和渠道连接的唯一真实源
Messaging Channels(消息渠道):
- WhatsApp (Baileys)
- Telegram (grammY)
- Slack / Discord / Signal / iMessage
- Google Chat / Microsoft Teams
Client Layer(客户端层):
- macOS App(菜单栏应用)
- CLI(命令行工具)
- Web Dashboard(浏览器控制台)
- iOS/Android Nodes(移动设备节点)
AI Providers(AI 提供商):
- Anthropic (Claude)
- OpenAI (GPT)
- Google (Gemini)
- Mistral
- Kilo Gateway
前置要求
系统要求
- 操作系统: macOS 12+ / Ubuntu 22.04+ / Windows 10+
- Node.js: 必须 ≥ 22(严格要求)
- 网络: 稳定的互联网连接
- 存储: 至少 500MB 可用空间
必需的账号
至少需要以下之一:
- AI Provider API Key:Anthropic API Key(推荐)或 OpenAI API Key
- 消息渠道账号:WhatsApp / Telegram / Discord 等(至少一个)
检查 Node.js 版本
# 检查当前 Node 版本
node --version

# 如果版本低于 22,使用 nvm 安装
# macOS/Linux
curl -o- https://raw.githubusercontent.com/nvm-sh/nvm/v0.39.0/install.sh | bash
nvm install 22
nvm use 22

# Windows (使用 nvm-windows)
# 下载:https://github.com/coreybutler/nvm-windows/releases
nvm install 22
nvm use 22
快速部署步骤
步骤 1: 安装 OpenClaw
macOS/Linux
# 使用官方安装脚本(推荐)
curl -fsSL https://openclaw.ai/install.sh | bash

# 或使用 npm 全局安装
npm install -g openclaw@latest
Windows
# 使用 PowerShell 安装脚本
iwr -useb https://openclaw.ai/install.ps1 | iex

# 或使用 npm
npm install -g openclaw@latest
验证安装
# 检查版本
openclaw --version

# 应显示类似: openclaw 2026.2.23 或更高版本
步骤 2: 运行引导向导
OpenClaw 提供交互式配置向导,自动完成初始设置:
openclaw onboard --install-daemon
向导会引导你完成三个步骤:
1. Authentication Setup(认证设置)
- 配置 AI Provider API Key
- 设置 Gateway Token(可选)
2. Gateway Configuration(网关配置)
- 选择默认 AI 模型
- 配置存储路径
3. Channel Integration(渠道集成 - 可选)
- 连接 WhatsApp / Telegram / Discord 等
- 首次部署可跳过,稍后配置
步骤 3: 配置 API Key
创建环境变量文件:
# 编辑配置文件
nano ~/.openclaw/.env
添加以下内容:
# Anthropic API Key(推荐)
ANTHROPIC_API_KEY="sk-ant-api03-..."

# 或 OpenAI API Key
# OPENAI_API_KEY="sk-..."

# Gateway Token(远程访问时需要)
# OPENCLAW_GATEWAY_TOKEN="your-secure-token"
⚠️ 安全提示:
- 不要将
.env文件提交到 Git - 使用强随机字符串作为 Gateway Token
- 定期轮换 API Key
步骤 4: 启动 Gateway
# 方式 1: 使用 systemd(推荐 - Linux/macOS)
openclaw gateway start

# 方式 2: 直接运行(前台)
openclaw gateway

# 方式 3: systemd user service(开机自启)
systemctl --user enable openclaw-gateway
systemctl --user start openclaw-gateway
步骤 5: 验证部署成功
检查 Gateway 状态
# 快速健康检查
openclaw doctor

# 完整系统诊断
openclaw status --all

# 检查 Gateway 状态
openclaw gateway status
预期输出:
✓ Gateway running (PID: 12345)
✓ WebSocket server: 127.0.0.1:18789
✓ API providers: anthropic (configured)
✓ Health: OK
✓ Uptime: 5 seconds
访问 Web Dashboard
# 启动浏览器控制台
openclaw dashboard
或直接访问:http://127.0.0.1:18789/
测试 AI Agent
# CLI 测试
openclaw chat "Hello, tell me about yourself"
配置文件说明
OpenClaw 使用以下配置文件:
| 文件 | 路径 | 用途 |
|---|---|---|
| 全局配置 | ~/.openclaw/openclaw.json |
Gateway 和 Agent 配置 |
| 环境变量 | ~/.openclaw/.env |
API Keys 和敏感信息 |
| Workspace | ~/.openclaw/workspace/ |
Agent 工作目录 |
| 认证配置 | ~/.openclaw/credentials/ |
OAuth 令牌 |
| 会话存储 | ~/.openclaw/agents/<agentId>/sessions/ |
聊天历史 |
核心配置文件示例
~/.openclaw/openclaw.json:
{
  "gateway": {
    "port": 18789,
    "host": "127.0.0.1"
  },
  "agents": {
    "defaults": {
      "model": "anthropic/claude-sonnet-4-5",
      "workspace": "~/.openclaw/workspace"
    },
    "list": [
      {
        "id": "main",
        "default": true,
        "workspace": "~/.openclaw/workspace",
        "agentDir": "~/.openclaw/agents/main/agent"
      }
    ]
  },
  "channels": {
    // 渠道配置(可选)
  }
}
常见问题
Q1: Gateway 启动失败 - 端口被占用
错误信息:
Error: listen EADDRINUSE: address already in use 127.0.0.1:18789
原因: 端口 18789 已被其他进程占用
解决方案:
# 检查占用端口的进程
lsof -i :18789

# 停止旧的 Gateway 进程
openclaw gateway stop

# 或更改端口(在 openclaw.json 中)
{
  "gateway": {
    "port": 18790  // 使用其他端口
  }
}
Q2: API Key 无效或未配置
错误信息:
Error: Missing or invalid API key for provider: anthropic
解决方案:
# 1. 检查环境变量文件
cat ~/.openclaw/.env

# 2. 确认 API Key 格式正确
# Anthropic: sk-ant-api03-...
# OpenAI: sk-...

# 3. 重启 Gateway 使配置生效
openclaw gateway restart
Q3: WebSocket 连接被拒绝
错误信息:
WebSocket close (1008): unauthorized: gateway token missing
原因: CVE-2026-25253 修复后,需要配置 Gateway Token
解决方案:
# 1. 生成安全的 Token
export OPENCLAW_GATEWAY_TOKEN="$(openssl rand -base64 32)"

# 2. 或在 .env 文件中配置
echo "OPENCLAW_GATEWAY_TOKEN=your-secure-token" >> ~/.openclaw/.env

# 3. 重启 Gateway
openclaw gateway restart
📖 详见:WebSocket 连接排查指南
Q4: Node 版本不兼容
错误信息:
Error: OpenClaw requires Node.js >= 22
解决方案:
# 安装 Node 22
nvm install 22
nvm use 22
node --version  # 应显示 v22.x.x
Q5: 设备配对失败
症状: iOS/Android Node 无法连接到 Gateway
解决方案:
# 1. 检查待配对设备
openclaw pairing list

# 2. 批准配对请求
openclaw pairing approve <device-id>

# 3. 如果是本地连接,检查自动批准设置
# 在 openclaw.json 中:
{
  "pairing": {
    "autoApproveLocal": true
  }
}
下一步
基础配置完成后
-
连接消息渠道 - WhatsApp 集成指南 - Telegram 集成指南 - Discord 集成指南
-
配置 Multi-Agent 路由 - Multi-Agent 路由详解 - Agent Workspace 管理
-
启用高级功能 - Canvas 和 Browser Automation - Cron 定时任务
进阶主题
社区资源
- 官方文档: docs.openclaw.ai
- GitHub 仓库: github.com/openclaw/openclaw
- Discord 社区: discord.gg/clawd(112k+ 成员)
- 问题反馈: GitHub Issues
参考资料
变更历史
| 日期 | 版本 | 变更说明 |
|---|---|---|
| 2026-02-25 | 1.0 | 初始版本,基于 v2026.2.23 |
提示: 如果遇到问题,运行 openclaw doctor --fix 自动诊断和修复大部分配置问题。
安全提醒: 请勿在公共网络暴露 Gateway 端口。远程访问建议使用 Tailscale、VPN 或 SSH 隧道。